10 years ago, I published my first wefting and wig-making tutorial on cosplay.com! It’s still one of my most popular tutorials that you can use for many different kinds of projects.
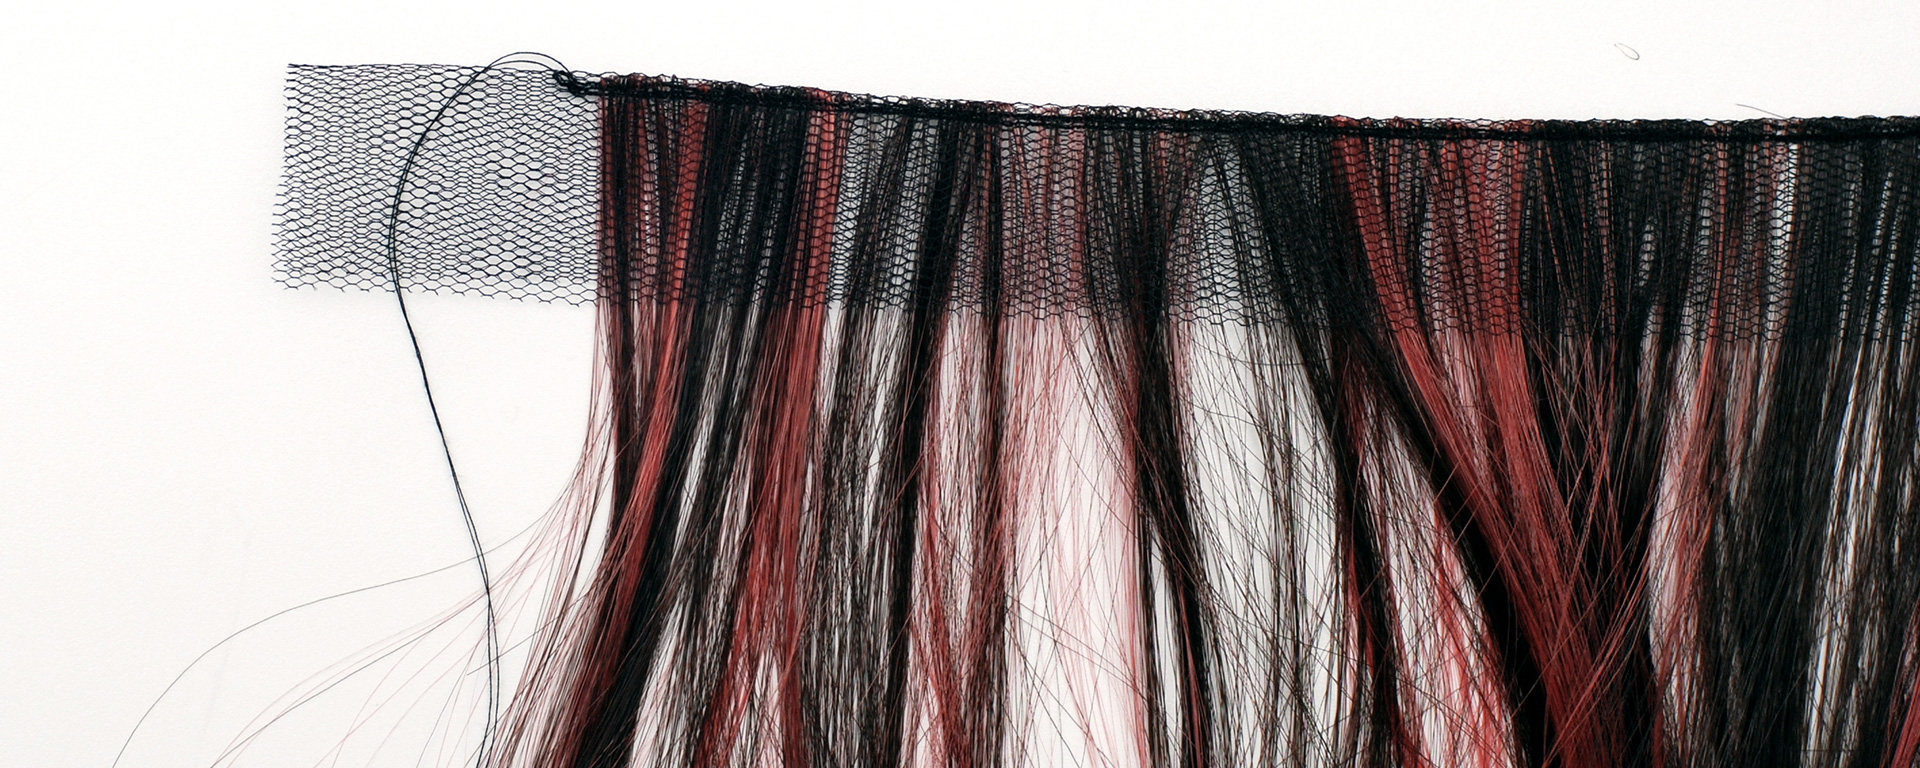
Most wigs and hairpieces are made of wefts. Wefts are rows of hair or synthetic fiber that has been woven or sewn together, to form what looks like a fringe or hula skirt made of hair.
- Your wig is not thick enough for the style you want to achieve? Just sew in extra wefts to add volume!
- Your wig looks too plain, so you want to spice it up with highlights or colored tips? Sew in wefts in a different color!
- You want to style a huge beehive, meter long braids, hairbuns the size of a football? It can all be done with extra fiber, e.g. in the form of wefts!
You can buy ready-made wefts or harvest them from a spare wig. However, you might as well sew wefts yourself! That way you’ll be free to choose colors and length of wefts, plus it’s usually cheaper.

What You Need
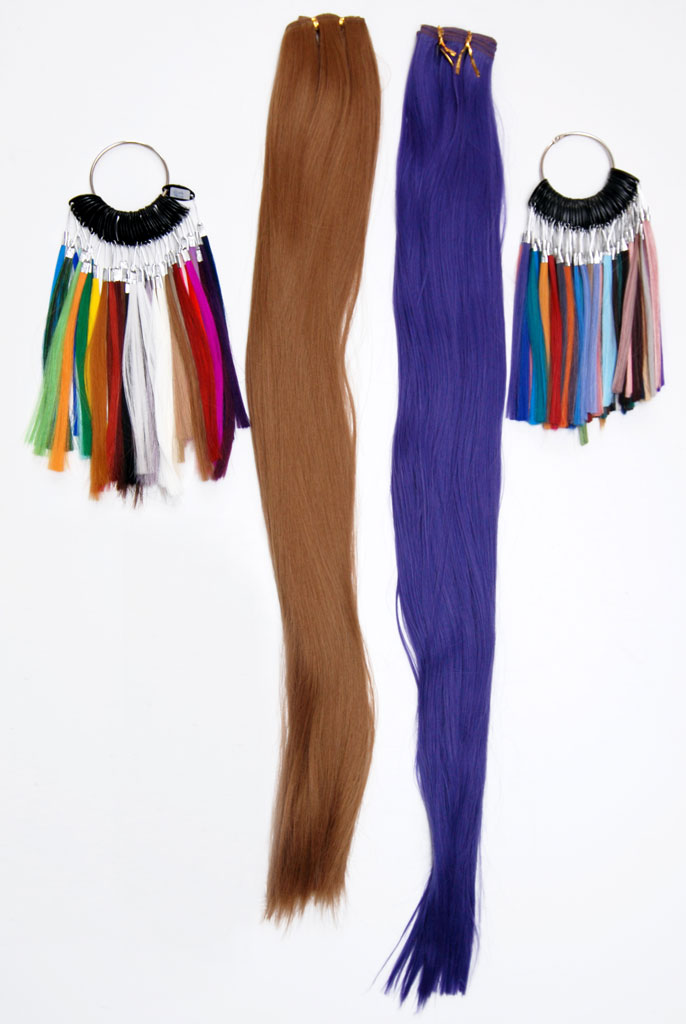
- synthetic hair (loose extensions, braiding hair, bulk hair), preferably „Silky Straight Kanekalon“ quality
- lots (!) of yarn (regular sewing thread) in a matching or darker color
- tulle in a matching color (cut to strips, ca. 5–7cm x 40cm – that’s 2–3″ x 16″)
- sewing machine and spare needles
- scissors, sewing pins, comb, optional: blow dryer, wig conditioner
- ribbons (e.g. sateen), elastic hairties, hairclips
- large sheets of paper (to cover your work area)
Buy loose extensions online e.g. at Doctored Locks (USA) or at an ethnic beauty supply store. Careful: some shops will only sell „Jumbo Braid“ fiber that has a rough, kinked texture (good for ethnic hairstyles). Do not use Jumbo or Yaki for wefting, it does not match the silky texture of most wigs!

Step One: Preparations
Lay out large sheets of paper (e.g. old newsprint) to form a smooth surface on the floor or a second table, right next to your sewing machine. Protect your work area from air draft, pets, and other disturbances.
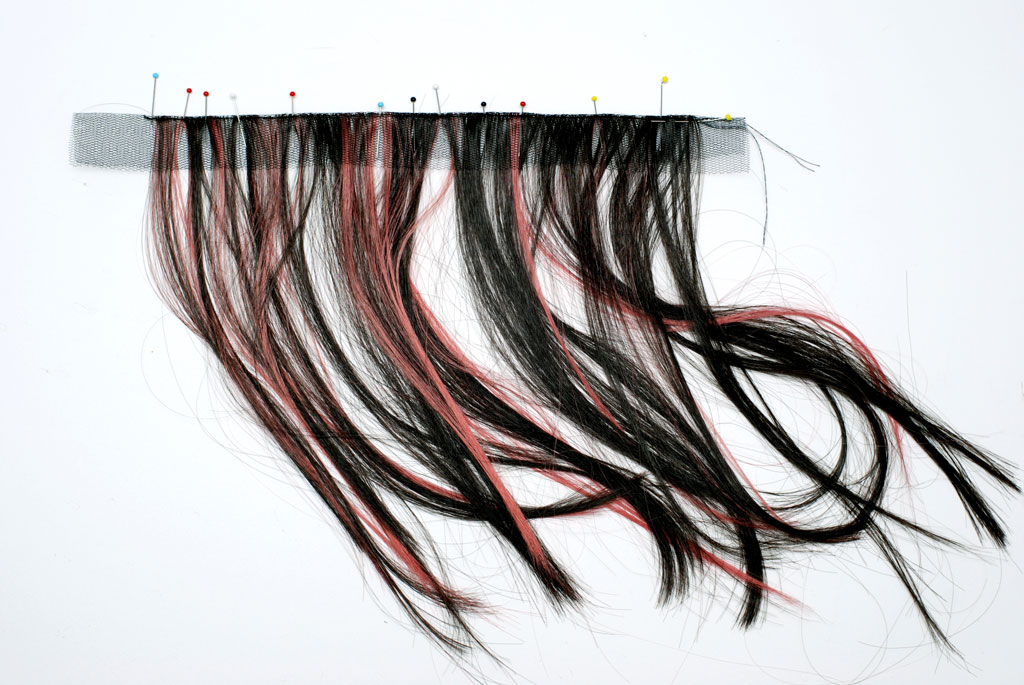
Packaged extension hair usually measures 120cm (48″). In this tutorial, I’ll be sewing shorter wefts, so I cut the fiber in half. Unprocessed, it is 60cm (24″) long, but it will be folded in half during wefting – yielding 30cm (12″) short wefts. Grab the fiber bundle by the middle and leave it hanging (like „U“ turned upside down). Carefully section off a strand. Here’s my advice on working with extension hair.
Place each strand of hair on the work area, forming a „U“. Have it pointing at you like a loop so it’ll be easy to pick up. Fill the work area with as many strands of hair as you can. If you’re going for multi-colored (streaked) wefts, place the colors on top of each other. You can mix as many colors as you want, just make sure to use small amounts of hair and place the fibers parallel to each other, ends even.

In order to sew wefts using your sewing machine, you’re going to need a supporting material to keep the hair from being sucked into the machine and messing it all up in a matter of seconds! Tulle is the fabric of choice: it’s extremely lightweight, see-through, and the edges don’t fray. Cut strips of tulle ca. 5–7cm (2–3″) wide and iron them flat (on low heat). The tulle strips should be around 40cm (16″) long. That’s enough to wrap the weft around the back of your head, forming one row in a wig.
Step Two: Sewing Hair to Tulle
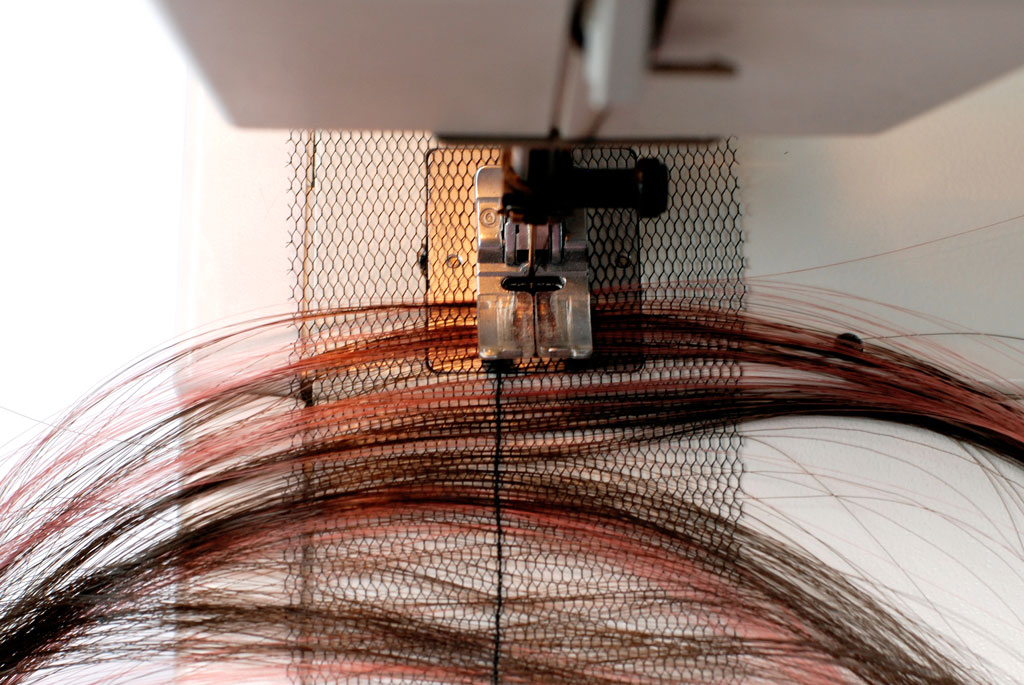
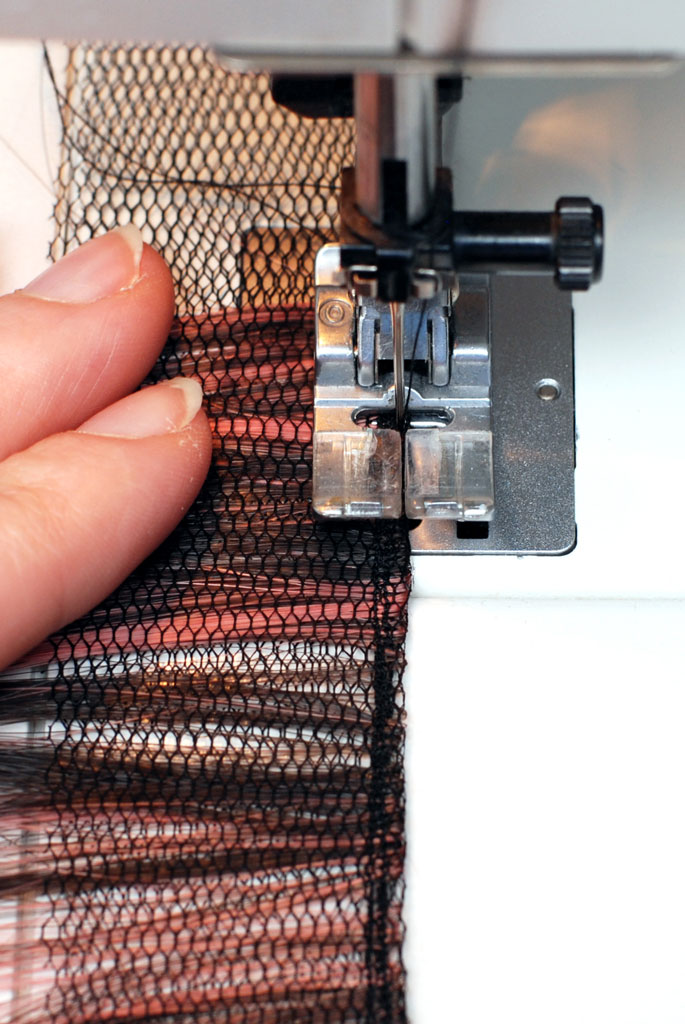
Set your sewing machine to a straight stitch and a very small stitch length (between „1“ and „0“, just a little above the buttonhole setting.)
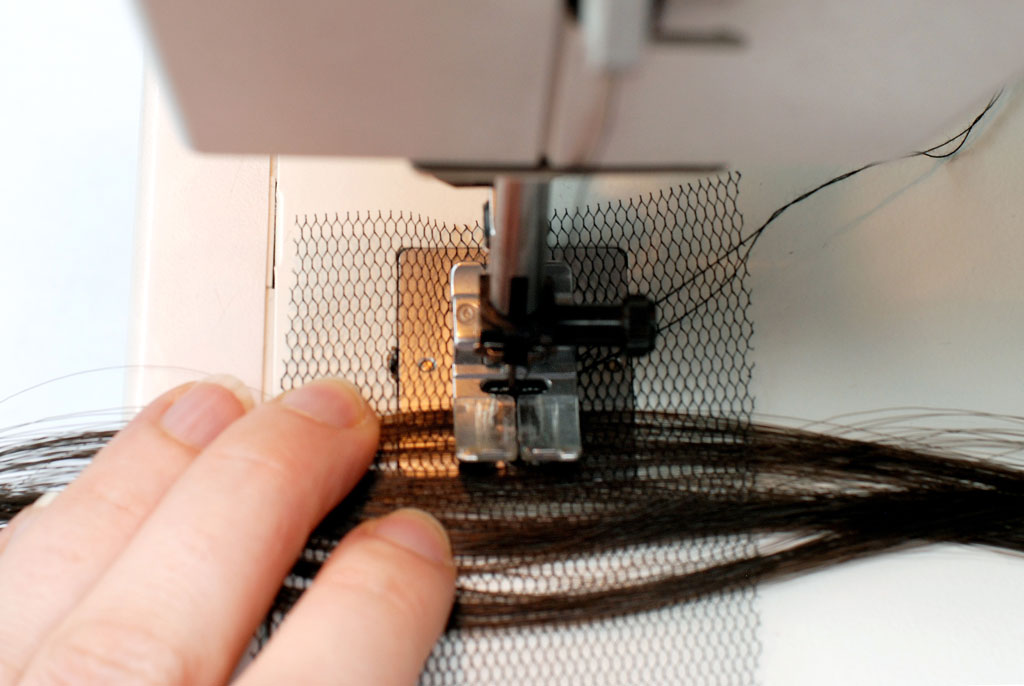
Place the tulle underneath the presser foot of your sewing machine, ready to go. Take a strand of hair and spread it out on the tulle, placing the middle of the strand where the needle is. Start sewing slowly (no need to lock the seam) and guide the hair using both hands.
Important notice: Spread the hair out thin and even across the tulle. Try to avoid bald spots, but more importantly, do not allow the hair to clump together. If you sew on too much hair at once, it will not be fixed properly!
Shortly before you run out of hair to sew, take the next strand and feed it into the machine without leaving a gap. Repeat until you reach the end of the tulle strip. Stop sewing an inch or so before the edge, making sure you do not have any hair left over. Again, no need to lock the seam, the stitches are so small they will not unravel.
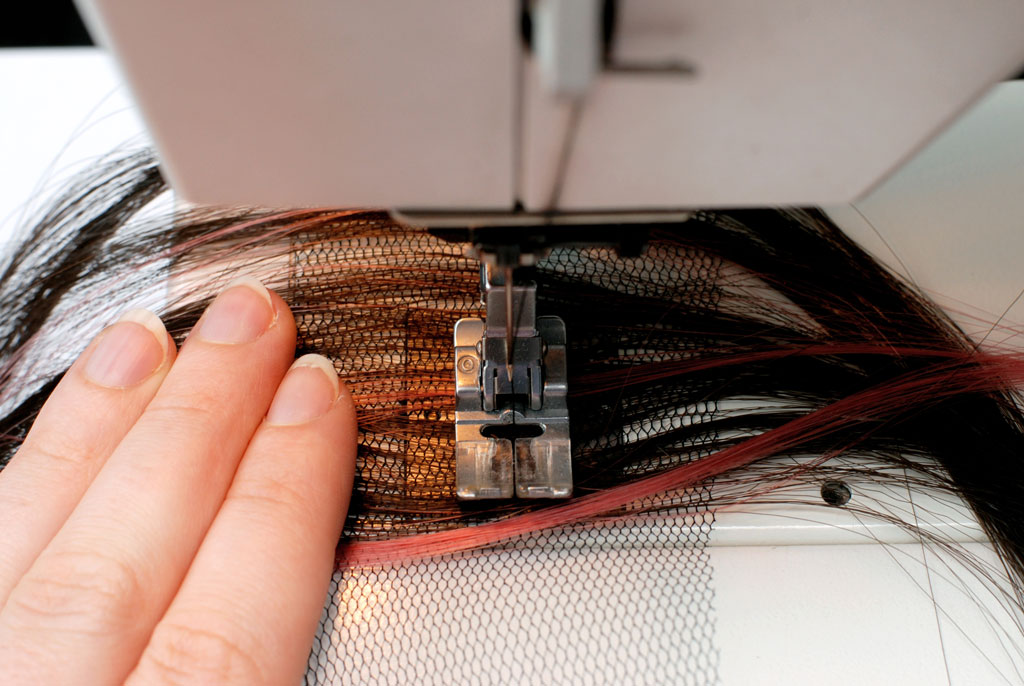
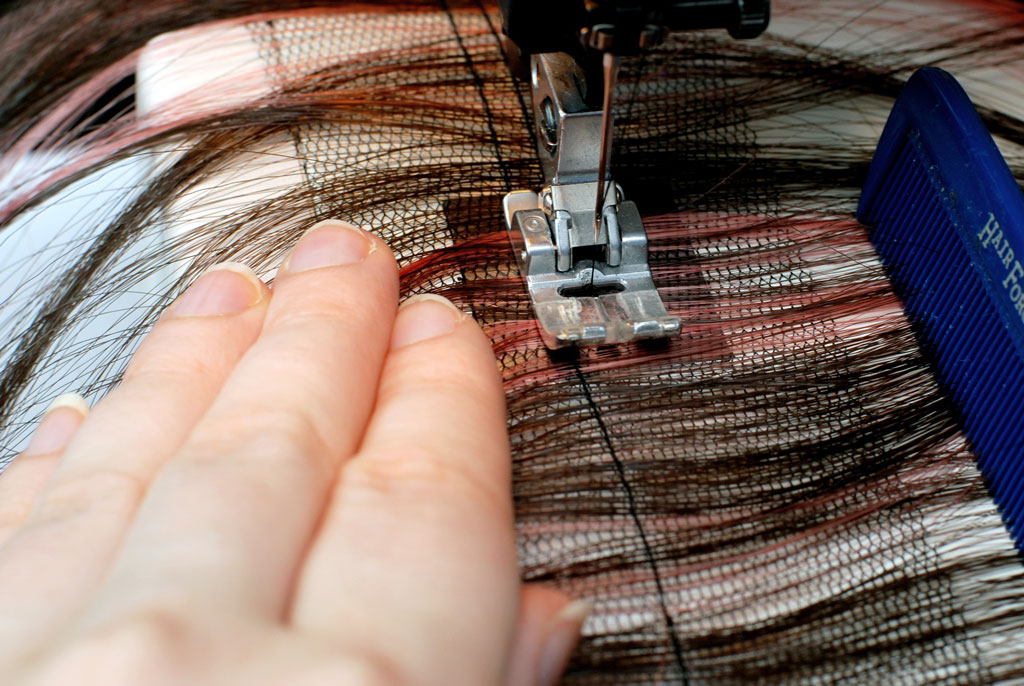
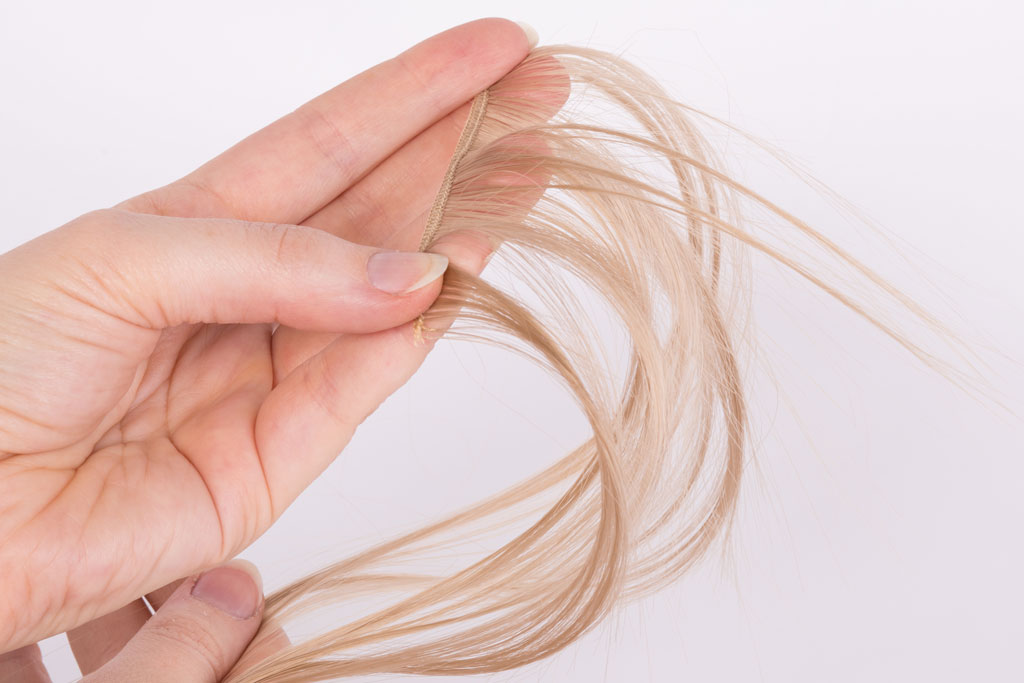
You have now successfully fixed the hair on the tulle strip, but at this stage, it’s still very fragile. Avoid pulling on the hair or brushing it! Carefully pull the piece from the sewing machine, then place a second seam right next to the first, 5–10mm (ca. 3/16–3/8″) apart. Make the seam straight and parallel to the first seam.
Note: For a clean result, it is mandatory that you keep the hair laid out straight and parallel, at a 90° angle from the stitching line. I recommend guiding the hair with your left hand and using a comb in your right hand to keep it straight (do not pull on it, only guide it gently!)
When you’re done with the second seam, take the piece from the sewing machine.
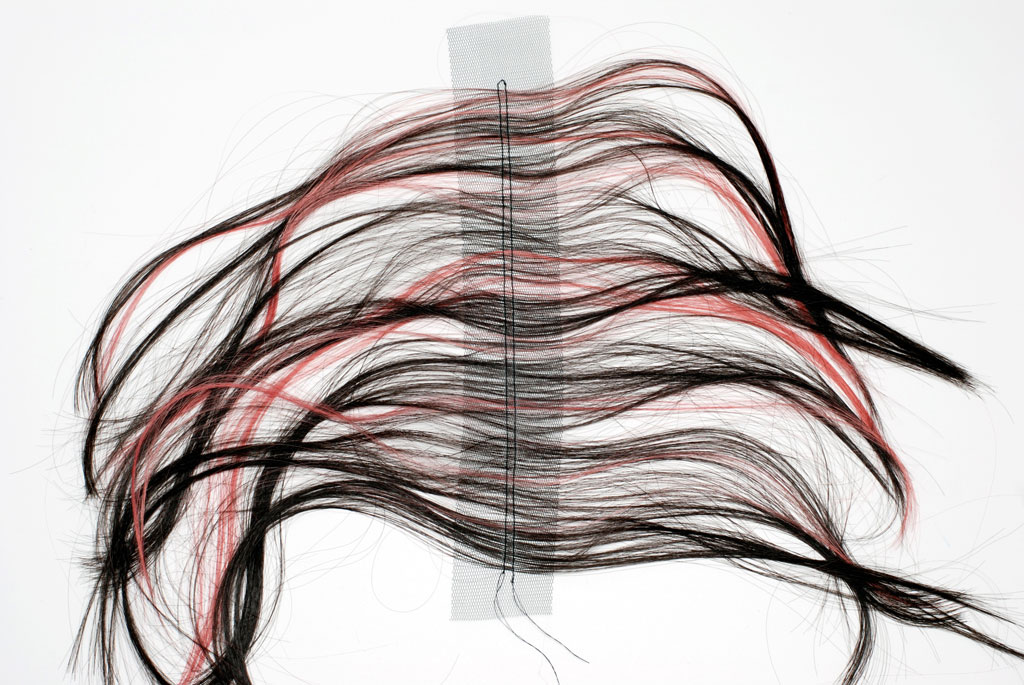
Step Three: Fold the Weft and Sew It Together
Now we’ll turn this not-quite-sealed hair into a durable weft. Turn it tulle side up and fold the tulle in half lengthwise. Use the center between the two seams as a folding line and fix it with lots of pins (perpendicular to the seamlines).
Try to keep the hair from crisscrossing or exposing bald spots when doing this!

This step requires some patience and finesse. If you manage to fold the fiber evenly, you’ll be rewarded with a clean-looking weft later.

Take the folded weft back to the sewing machine and stitch another line to sew the layers together. Stitch alongside 3–4 mm (1/8–3/16″) from the fold (i.e. the edge of your weft), either right on top of the existing seams or a little bit left of them. Remove the pins as you go! Sewing right over a pin will result in a little gap in the hair.
Your weft is as good as done now! To make sure it’s durable and can be brushed later, I recommend that you stitch another line or two just to be safe. Place the stitching line close to the edge.
Pull on the hair to check if it’s properly fixed. If you can still pull out a hair, stitch another line between the visible seams. In total, you should have fixed the hair with four to five rows of stitches.
Step 4: Finishing Touches
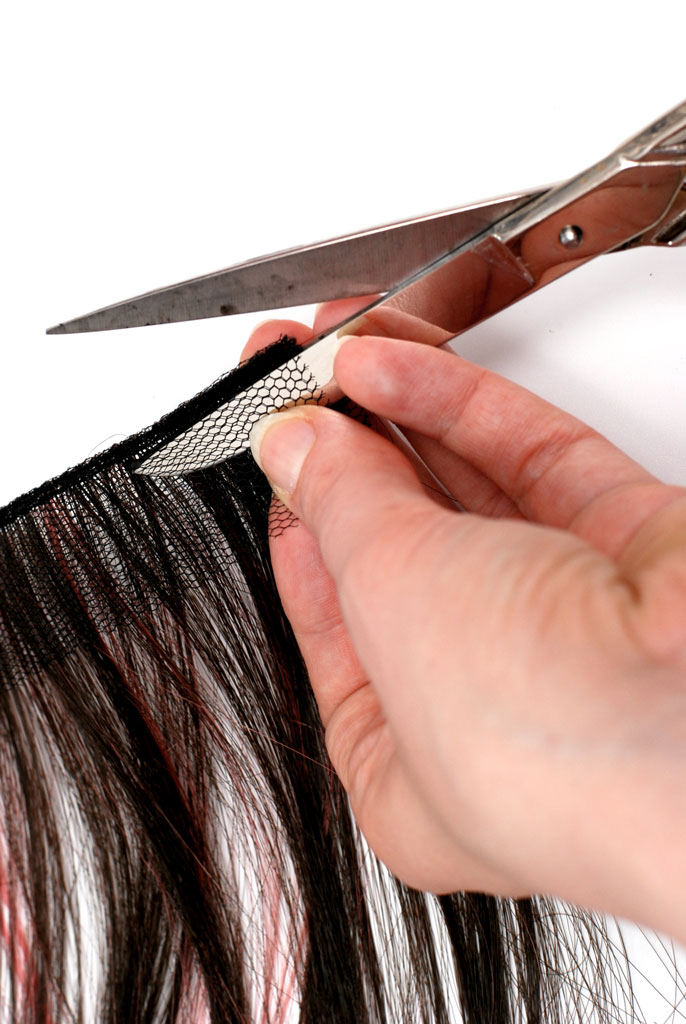
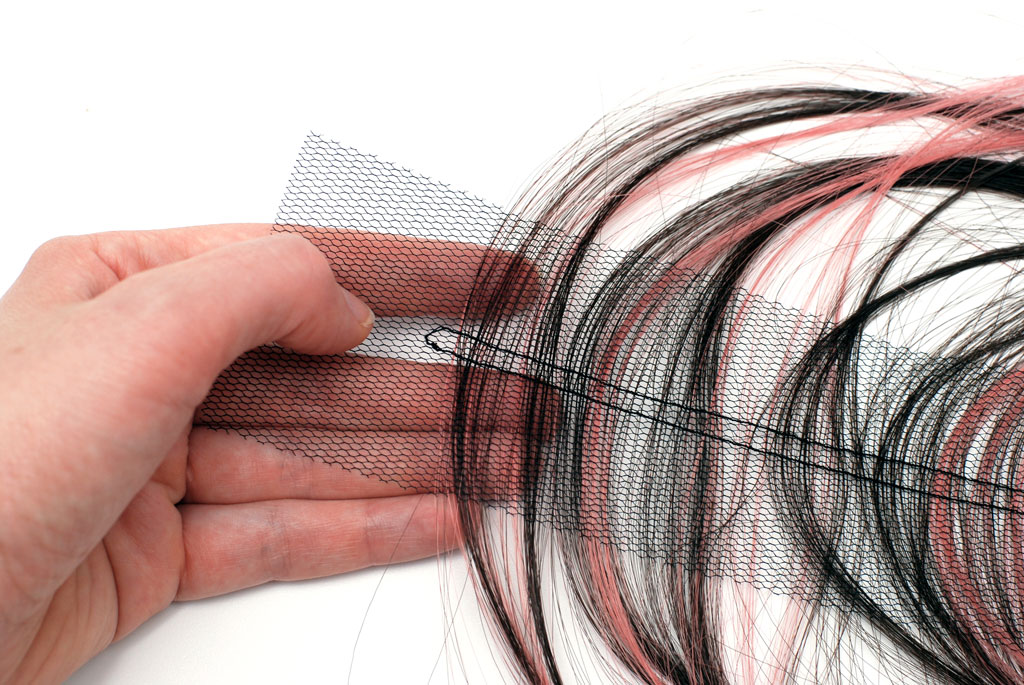
You do not need the excess tulle anymore. Cut off the ends with the thread ends, brushing the hair to the side so you don’t cut into it. Trim the tulle on both sides of the weft, as close to the seam as possible. I’m using fabric scissors with a rounded tip that slides easily between the layers without cutting into the hair.
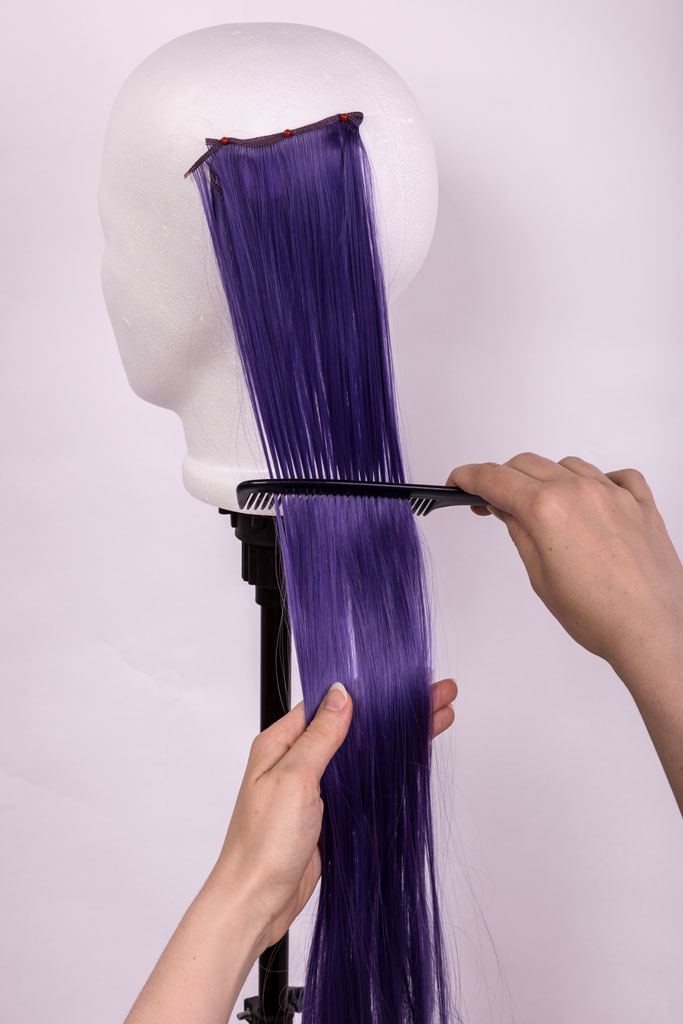
Long wefts will need to be detangled before use. Hang them on a laundry line or pin them to a styrofoam head (the head must be fixed on a wig stand or tripod to keep it from tipping). Detangle the fiber with a wide-tooth comb or detangling brush. Damaged and kinky fibers can be straightened with hot water or a blow dryer.
I have an in-depth wig detangling tutorial in my book, Wigs 101!
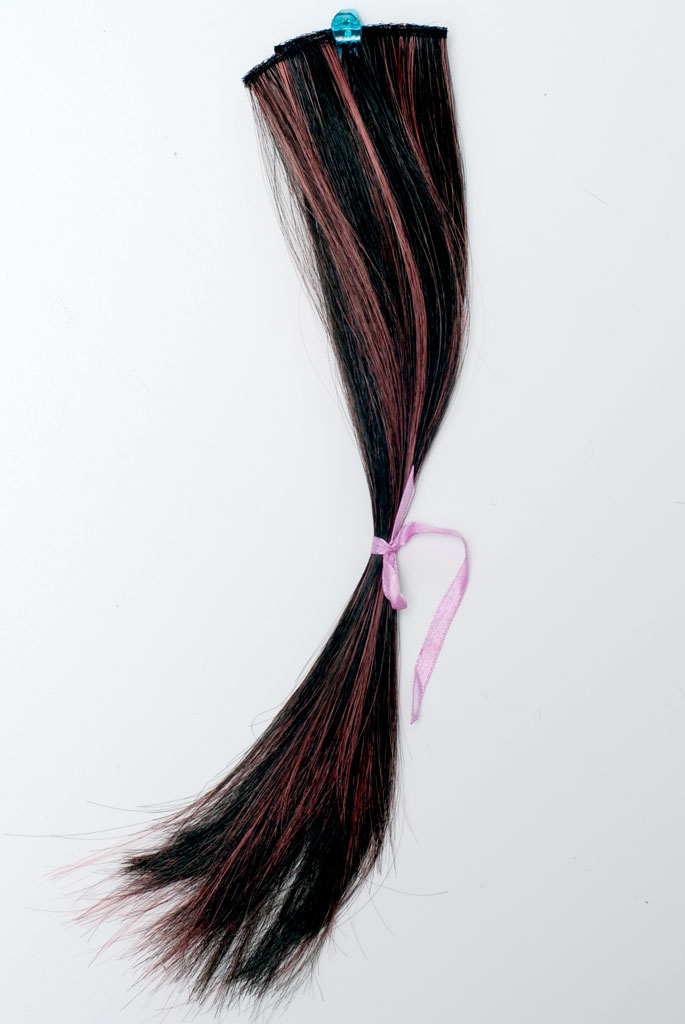
Short wefts are easy to detangle by brushing them with your fingers once. Uneven ends can be trimmed with scissors. To store the weft, fold it at the seam and tie it off with ribbons or cut-open elastic hairties to keep them from tangling. Roll them up and put them in a ziploc plastic bag.
After sewing wefts, you should definitely clean your sewing machine to remove thread dust and possible hair residue from the bobbin compartment. With the machine running at full speed, it will have collected a lot of muck, and plastic wig fiber has absolutely no business clogging up the works.
Variant: Long Wefts
In this tutorial, I’ve folded hair in half to sew a 30cm (12″) short weft. Of course you’re free to sew longer wefts than that! Double up 120cm long extensions and you’ll get a beautifully thick, 60cm long weft.
And there’s no need to always fold the hair exactly in half. You can move the fold towards one end if you want to sew even longer wefts. Just make sure that the hair extends over the edge of the tulle by 5–10cm (2–4″) on the shorter end so you’ll still be able to fold and sew it properly. When you sew the weft into your wig or hairpiece later, the shorter ends should lie flat against the head (facing the wig undermesh) so they don’t stick out of the hairdo. When you take a closer look at wefts in a store-bought wig, you’ll see that they often have shorter baby hair on the underside as well.
Once you’ve mastered the wefting technique, your creative options are endless! You’re free to create wefts in any color and length you want. With a little practice, you’ll be able to sew neat, even wefts with a narrow seam. With these wefts, you can thicken up a wig that’s too thin, create hair extensions or spice up your wig with colorful highlights and tips.
Find more styling tips in my book, „Wigs² – Level Up!“
And make sure to read my quick guide on wefts and extensions: