
Cosplay hairstyles defy the rules of gravity! A fine example: so-called ahoge (Japanese) or cowlicks, protruding strands of hair that stick out from the head at an impossible angle.
While hairspray can make short strands and chunky spikes stand up on their own, these kind of long, narrow antennae need more support. At the same time, the hair should still look natural – I don’t like drowning it in glue!


Here’s how I do it. I first learned this method from Katie Bair of Petting Zoo Wigs, and I have been using it for over 15 years. These ahoge keep their shape, no matter how much action they see – making your wig a showstopper at the next con!
Material
- wig
- foam head
- tail comb
- blister packaging (e.g. from a figure)
- glue
- hairspray / hair lacquer
- hair glue / spiking glue
- blow dryer
- hair scissors and crafting scissors
- hair clips and section clips
- long pins
- protective gloves

The secret of my ahoge is the firm but flexible core. For this, I salvage a material that would otherwise end up in the trash: a piece of clear plastic that I cut out of a blister pack. You’ll frequently find this transparent packaging material being used for toys and action figures.
For spiky hairstyles and protruding strands, I use my strongest hairspray and spiking glue, e.g. from Got2B.

The actual glue should be clear drying and flexible. For my wigs, I like to use contact cement (Uhu Kraft or Pattex), styrofoam glue (Uhupor or FoamTac) or fabric glue (Gutermann). We are only going to use a small amount of glue for this project, but please work in a well-ventilated area and wear protective gloves when it gets messy.


Pro Tip: You’ll want to be able to part the hair and style it upwards without revealing the cap of the wig, so I recommend using a wig with a skin top or a thick top, where you can hardly see any gaps between the wefts.
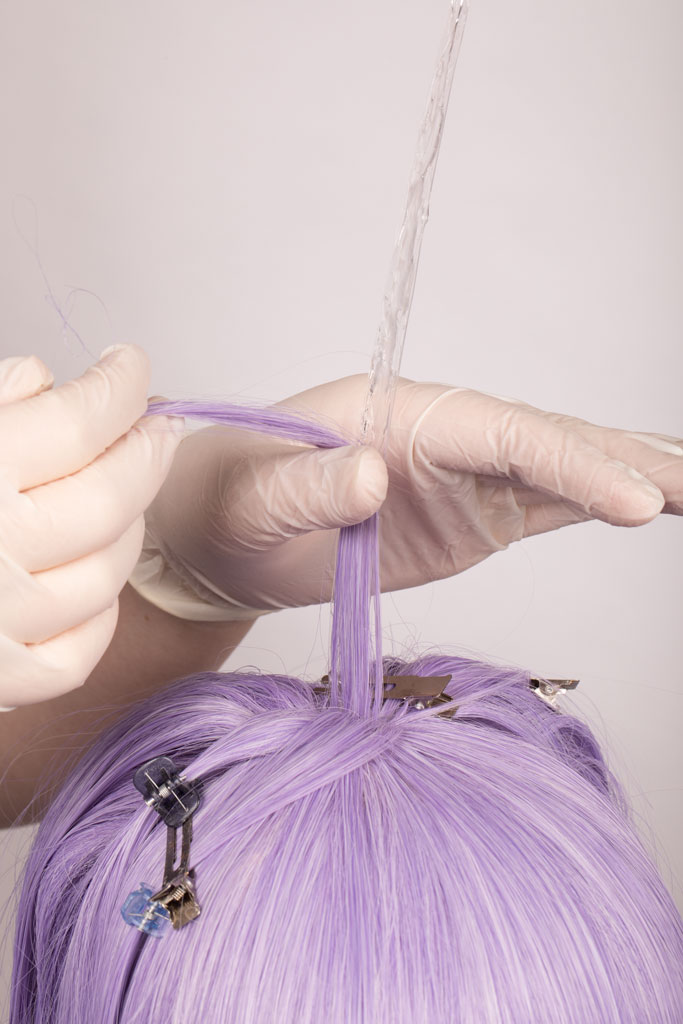
Section off a strand
Put the wig on a styrofoam head for styling and secure it with pins. I like to style the bangs and the rest of the wig first, so I can tell exactly how much hair I have left to style the ahoge. Then, section off the strand that needs to stick out.


The wider the base of the strand, the more stable it will be – think of a pyramid, or a pole with supporting pillars. Keep the rest of the hair out of the way with sectioning clips.
Split the strand in two. Use a tail comb for sectioning, or a long pin if you find the comb is not precise enough.


Split the hair again so that you end up with four thin strands. Secure each of the four sections with a clip so that they don’t get mixed up again. The two sections in the middle will form the core of the strand, and the parts to the left and right will form the top layer.
Attach the plastic core
Cut a narrow strip of plastic from the blister pack. Use your crafting scissors, not your good hair shears for this.

Depending on the length of the strand and how far it needs to stick out, a short piece of plastic may be enough to support just the roots. For longer ahoge, I cut a 20-25cm (8-10″) long strip. At any rate, the plastic core must be shorter than the hair it supports!


Taper the strip and round off the tip a bit. Carefully bend the lower end, to give the strip a foot to stand on. (Or you can just use the part of the packaging that already has a curved edge.)


I like to cut small notches into the „foot“. This makes it easier to slide the plastic strip into the hair.

Glue the notched „foot“ of the plastic strip to the wig top, exactly in the middle of the four strands of hair, so that there are two strands to the left and two strands to the right of the plastic core. Let the glue cure for a few minutes until it’s stringy, then press it firmly into the wig.


Secure the plastic strip with a pin if necessary, until the glue has dried. It is important that the „foot“ sits flush with the wig top and does not wobble around.
Apply a thick layer of glue to both sides of the plastic and let it dry briefly. As long as the glue is still sticky, attach the two inner layers of hair to the plastic so that it is covered evenly. Wear protective gloves so you can touch the glue safely.


Be sure to pull the hair up and hold it taught, so that the strand does not hang limply. You can use a blow dryer to make it dry faster and bend the plastic into shape at the same time. In order to hide the point where the plastic core meets the unsupported hair tip, make sure they form a smooth curve and the strand does not take a sharp bend.


Trim the hair to the desired length. Cut it at an angle, so that the strand grows thinner toward the tip. However, make sure the hair is still longer than the plastic strip.
Blending and finish
Pro Tip: The outer sections need to be a little wider compared to the inner strand, so they will completely cover the core.

Apply hairspray generously to the upper and underside of the core and to the two remaining strands (the loose hair). Cover the core with the outer layer of hair.


You don’t need actual glue for the top layer, hairspray alone should be sticky enough! Press the strand together and set it with blow dryer heat. You can use clips or ribbons to hold the fiber in place while you work your way towards the tip. Go step by step until all the hair is fixed in place.

The hair should completely cover the core so that no more plastic or glue are visible. For a clean look, make sure that no stray hairs are sticking out. Always smooth out the hair with a fine-tooth comb before fixing it in place.
Trim the tip, taper it and thin it out if it’s still too bulky.


Apply hairspray and hair glue (strong gel for spiky hairstyles, e.g. Got2B „glued“) and work it into the tip. Smooth out and shape the strand until it looks like it was made of one piece. Blow dry the tip into shape, then leave the hair glue to air dry.

If your wig has two or more protruding strands, style them one by one, just like the first ahoge. Attach the plastic core with glue, cover it with glue and the (narrow) inner layer of hair, let it all dry before you proceed to cover it with the (wider) top layer of hair – using only a blow dryer and hairspray.


Wear and Care
The finished ahoge go along with every movement, do not collapse and remain in shape even after repeated wear. Plus, they bob so beautifully!
The only thing you shouldn’t do is force the strands down or bend them, as this can cause the plastic to bend or break. It’s best to place the wig on a foam head for storage and transport, making sure that the top will not bump into other objects. To carry the wig in a suitcase or box: stuff paper around the strand for padding, so it will not get crushed.

If you start seeing frayed ends or hair coming loose, brush out the product and glue the hair back together again with hairspray and hair glue. After all, the outer, visible layer of hair is not permanently glued. The styling products that hold it together can be removed at any time to repair or correct the shape.
Pro Tip: When you brush out the tip, hold the strand firmly at the tip of the plastic core, to avoid pulling loose the glued hair.


The same is true if you want to change the size and shape of the ahoge: brush out the top layers of hair so that they separate from the core, section off new hair from the wig (if needed), and glue everything back together with hairspray and hair glue.
Did you know? You can use the ahoge method to create huge protruding bangs, like I did for this Classic Aerith! Use multiple wide plastic strips to support only those strands that stick out from the head at the steepest angle.


Can’t wait to style your own wigs, but you’re still unsure how to find the right base wig for the more extreme styles? I’ve got a guide for you!